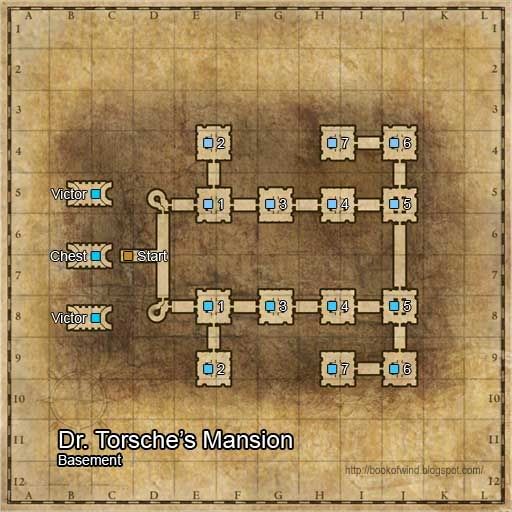
Dr. Torsche's Mansion Basement

Boss:
- Victor (lvl135)
lifeless / light / none / medium
hp: 5,080,582
AR / ATK: 69 / 13371
DR / DEF: 69 / 178
RES: Fire 30, Ice 30, Lightning 30, Mental 30
Normal Mobs (in accordance with room numbers):
- Walter (lvl120)
- Helena (123)
- Sasha (lvl125)
- Llyod (lvl128)
- Pyg (lvl130)
- Wight (lvl130)
- Gwraig (lvl130)
Location: D2 of Torsche Mansion Savage Garden
Cooldown: 1 day
Prerequisite: Expert, completed Catherine Torsche recruitment quest
Entry Cost: A Lump of Platinum x1 or Piece of Otite x100
How to Play: The Torsche Mansion Basement raid admits minimum 2 and maximum 4 families. Additional Pieces of Otite are required for buff purposes within the mission. The mission lasts 60 minutes. Following is the mission flow:-
- Dr Torsche announces the number of magical traps at the start of mission. This number, divided by 7, provides the code required to unlock Room #1. For example, if Dr Torsche says that are "42 magical traps", then the code for Room #1 is 42 / 7 = 6.
- Split the participating families into two teams, with one team going through the mission at the northern side and another team at the southern side.
- Once in Room #1, a permanent status causing rapid HP drain will be applied. This can be circumvented temporarily by clicking on the crystal structures to receive the Torsche's Liberation buff. This action cost 10 Pieces of Otite each time.
- At both northern and southern Room #1, defeat Walters to get them to drop the coded stones. Clicking on the stones will reveal the code engraved on them. For each side, keep clicking on these stones until the required code number appears. Once both sides hit the required code, Dr Torsche will announce that Room #1 has been successfully cleared. For example, if the required code is 6, then the stones last clicked by both northern and southern teams in Room #1 on their respective sides must have the number 6 on them.
- The codes required for the subsequent rooms are based on the first code, and they are simply the previous code +1 up to the maximum of 7, at which point, the code starts increasing back at 1. For example, if the code for Room #1 is 6, then the codes for Room #2 to #7 are 7, 1, 2, 3, 4, 5 respectively.
- Unlock all rooms using the map above as room number guide. (There is no need to unlock them in any order, and there is no need to work on any pair of rooms at the same time, so it does not matter if both sides progress at different speed. All the rooms will be unlocked as long as the required codes are in place.)
- Once all rooms are unlocked, portals will appear in the middle of all rooms at both sides, which will lead to the two Victor rooms.
- Once the Victors on both sides are defeated, the Treasure Chest will appear in the final room, which can be unlocked using the Treasure Box Key purchased from the Bounty Hunter's Guild at the cost of 3 Veteran Tokens each.
Thanks to PE for figuring out the steps to this mission. This is certainly one complicated mission.
Some parts of this mission has been changed in v4.7, though the flow is the same for versions prior. For earlier versions, the Torsche's Liberation buff lasts much shorter, there are 3 Victors instead of 2, and the final Treasure Chest is a normal chest (and not a Roulette).
I keep forgetting to take note of the stats for the normal mobs, but they are available for view on jGE's wiki (external link). Anyway, everything in this mission is Lifeless, and the normal mobs have AR/DR ranging from 60 to 65. Walter does Fire-based damage, Sasha does Lightning-based damage, and Wight does Mental-based damage.
The mission is relatively easy for Master characters. For fighter types, it's less painful to go through the mission on leather armour due to various elemental mob damage. The stones can be hard to target if there are too many mobs, and this can be alleviated by reducing the Monster slider in Game Options (Alt+O) to 0. The walls of the narrow corridors can sometimes get in the way of the camera, and this can be alleviated by using the "/camcol off" command.
Each Victor will drop 5 Veteran Enchantment Chips, 5 Gold Bars, some Honour Cards (which adds Family Reputation), and possibly some other rare loots on death. In addition, there's some chance for 10 Treasure Mobs to spawn in the Victor rooms, and these will drop Sun Stones on death.
The final Treasure Chest will reward random items via Roulette style to all participating families. (I don't know what the best possible loot for this mission is, but the common rewards include Veteran Chips, Gloves/Boots, level 100 30AR weapons, 27DR armours, and things along that line.)